
Last weekend I hosted a few wonderful ladies from our local Weston A. Price chapter for a lovely afternoon we called a Sauerkraut Jamboree.
It was such a treat to chop and talk, to make something with our hands, to feel connected to our food, and to come away with several jars of beautiful nutritious sauerkraut to boot!
My mom has several beautiful antique crocks in her home – including one nearly four feet tall! It has a heavy lid and takes two people to move (it’s a great statement piece!). I knew it was for sauerkraut but at the time thought that it was some ancient food no one ate anymore.
And now here I am thirty some odd years later, making a year’s supply of kraut in my kitchen with a handful of lady friends. Oh how times have changed!
I’m no fermentation expert, mind you, and I for sure don’t have time for finicky methods and multi-step processes. I bet you can imagine the relief it is that sauerkraut happens to be one of the very simplest preserves I make all year long.
You can do this. I’ll show you how.
No-Fuss Sauerkraut At Home
Equipment
- Sharp knife (or mandolin or food processor)
- Cutting Board
- Quart Mason Jars
- Wide Mouth Funnel
- Electric Scale
- Cheesecloth
- Jar Lids and Rings
Ingredients
- Cabbage tight storage varieties work best, but feel free to experiment
- Salt sea salt, kosher, or canning – be certain there are no additives or caking agents
Instructions
- Peel a few layers off the cabbage, reserving leaves for covering the kraut.
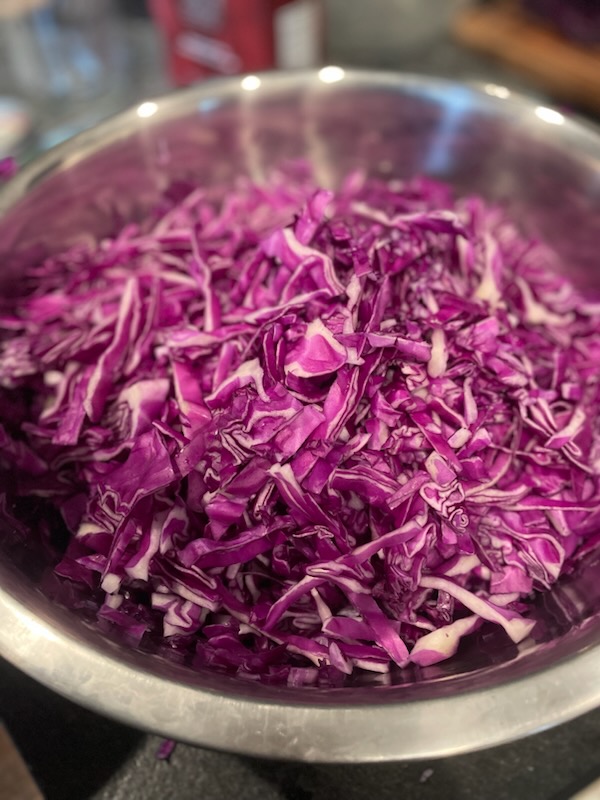
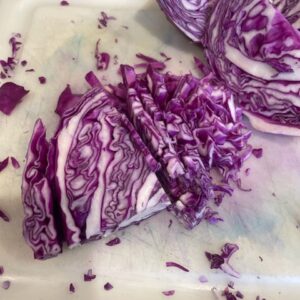
- Chop, dice, or grate your cabbage to your own preference. I really like my kraut in ribbons so I use a mandolin or a knife to get long slices. If you prefer tiny bits, use a grater or a food processor to make short work of it.
- Weigh your cabbage. I suggest using an electric scale with grams (I find the metric system is the easiest to use when making percentage calculations – and it’s not just because I’m Canadian – ha!).
- Multiply the cabbage’s weight by 2.2-2.5% For example, if you cabbage weighs 1247grams, multiplied by 0.022 (2.2%) is 27.4 grams. That’s how much salt you’ll use. If you like a saltier kraut, go for 2.5%.
- Weigh out the correct amount of salt and sprinkle it over the cabbage.
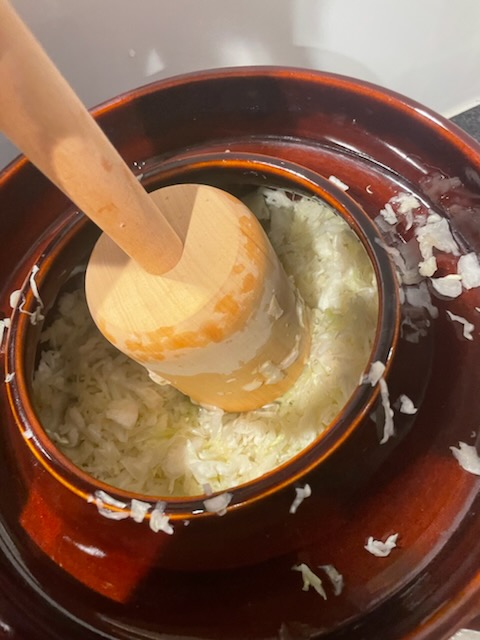
- Using both hands, mix in the salt and massage the cabbage. It’ll begin to wilt very quickly and then exude liquid as the salt penetrates the cabbage’s membranes. Once the cabbage is uniformly moist and you start to see liquid accumulate in the bottom of the bowl, you’re ready to pack it in jars.
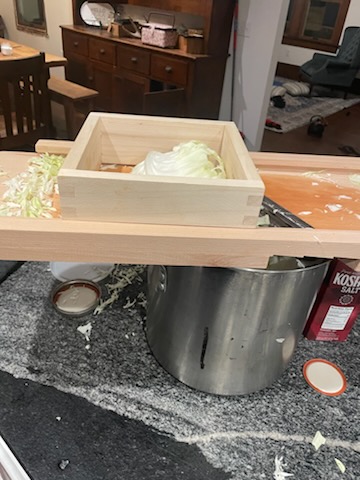
- Using a wide mouth funnel, spoon the cabbage into the jar, stopping periodically to tamp it down with the handle of a wooden spoon. Proceed until the jar is full, leaving about 1” headspace.
- There will be enough liquid to cover the cabbage, but to ensure it stays submerged (in order to ferment correctly and not spoil, no air can reach the cabbage), fold a cabbage leaf and tuck it under the shoulder of the jar, pressing down to be sure the air underneath the leaf bubbles out. If you need a weight to keep it down, wash a rock and drop it in (I mean, you can also buy lovely glass weights, but I like rocks – they’re cheap and easy to find. Chuckle).
- I like to cover the jar with a piece of cheesecloth and a jar ring (this allows the gasses that will form during the fermentation process to escape), but you can also cover the jar with a standard lid and ring. If you use a lid, you must “burp” the jar once a day (do this by unscrewing the lid, allowing the gas to escape, and screwing it back down).
- Put your jars on a baking sheet and set them somewhere out of the way and for sure out of direct sunlight. Mine are on the counter in my pantry. Liquid will ooze out of your jars as they ferment (hence the baking sheet).
- The kraut needs to ferment for at least two weeks. The longer it ferments, the more sour it becomes. For kraut I prepare in mason jars, I give them 2-3 weeks to ferment and then taste it. If I like it, I’ll cap it and put it in the fridge. If I want it to be more sour, I’ll put it back on the counter and wait another week.
- Once the fermentation process is complete, sauerkraut is technically shelf-stable. But to be safe, I either keep it in the fridge downstairs or the cold room (where the temperature is around 45ish* year round).
Spice things up
We generally think of sauerkraut made with cabbage only (I tend to make most of mine with white cabbage and sometimes a few jars of purple because it’s so darn pretty), but you can add all kinds of things to really brighten it up.
Try adding these to your kraut:
Shredded carrot (as much as ⅓ of the cabbage mixture)
Grated fresh ginger (say a tablespoon for 1 quart jar)
Herbs (almost any fresh herb will work, a teaspoon for 1 quart jar)
Spices (fennel seed, celery seed, carraway seed)
Give your kraut a boost with whey:
To really get the fermentation process underway, and introduce a beautifully complex flavor dynamic, add 1/2c whey (from clabbered fresh raw milk) to your cabbage mixture.
Here’s why YOU should make sauerkraut this year:
1) The process is so simple and comes together so quickly that you can make a quart in 20 minutes as an experiment or put up a year’s supply in an afternoon.
2) The ingredients are incredibly budget friendly. Cabbage + salt. Even if you get fancy and add carrots and/or herbs or spices, the bang for your buck in nutritional value can’t be beat.
3) When fresh produce is hard to come by in the winter months, one scoop of sauerkraut is a nutritional powerhouse, boosts your immune system, and nourishes your gut to keep your body healthy and strong.
Just let me know if you have questions or need help.
You can definitely do this!